Audio is big. Like, really big, and growing fast, to the tune of “two-thirds of the population listens to online audio” and “weekly online listeners reporting an average nearly 17 hours of listening in the last week”1. These numbers include all kinds of audio, from online radio stations, audiobooks, streaming services and podcasts (hi Spotify!). It makes sense too. Consuming audio content is easier to consume and more engaging than written content while you’re on the go, exercising, commuting or doing household chores2. But what do you do if you’re like me and don’t have the time or recording equipment to ride this podcasting wave, and just write the occasional blog post?
Well, you can always use a sophisticated deep learning text-to-speech model, train it on thousands of hours of audio content and endlessly tweak the model parameters, create an audio version of those occassional blog posts and host them on your website. Or, you know, you use the Google one3. The Cloud Text-to-Speech API is priced by character, and the first 1 million characters are free4! In this post, we’ll go over how to set up a Google API, write a Python script to extract text from a Markdown file, and create a Hugo shortcode5 to include the generated files in your static website.
Set up a Google API
In order to get started, we have to jump through a couple of hoops to create a text-to-speech API. Most of these are pretty straightforward, and are easiest to follow when you’re signed in to your Google account. It will be even easier if you’ve enabled billing which should be the default on a personal account (although you may have to add a payment method)6.
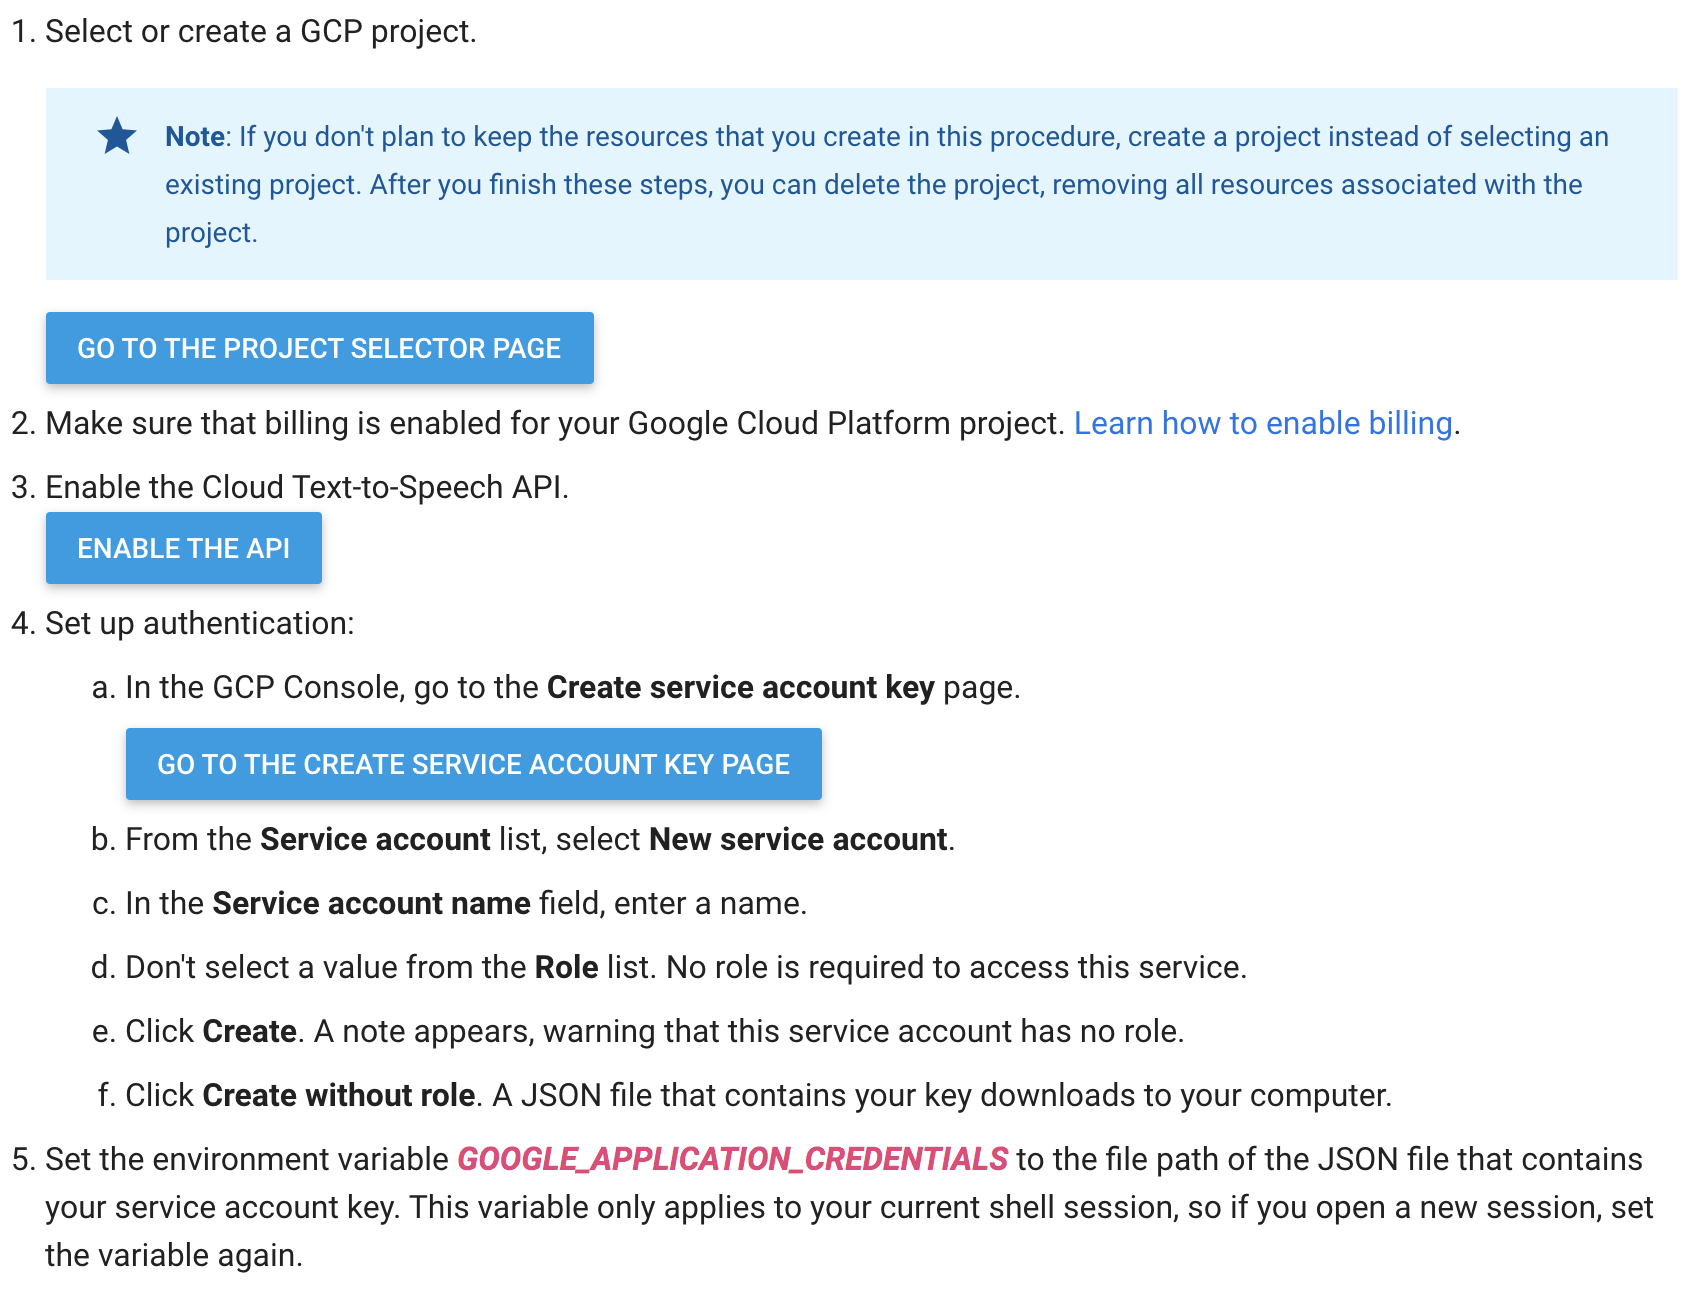
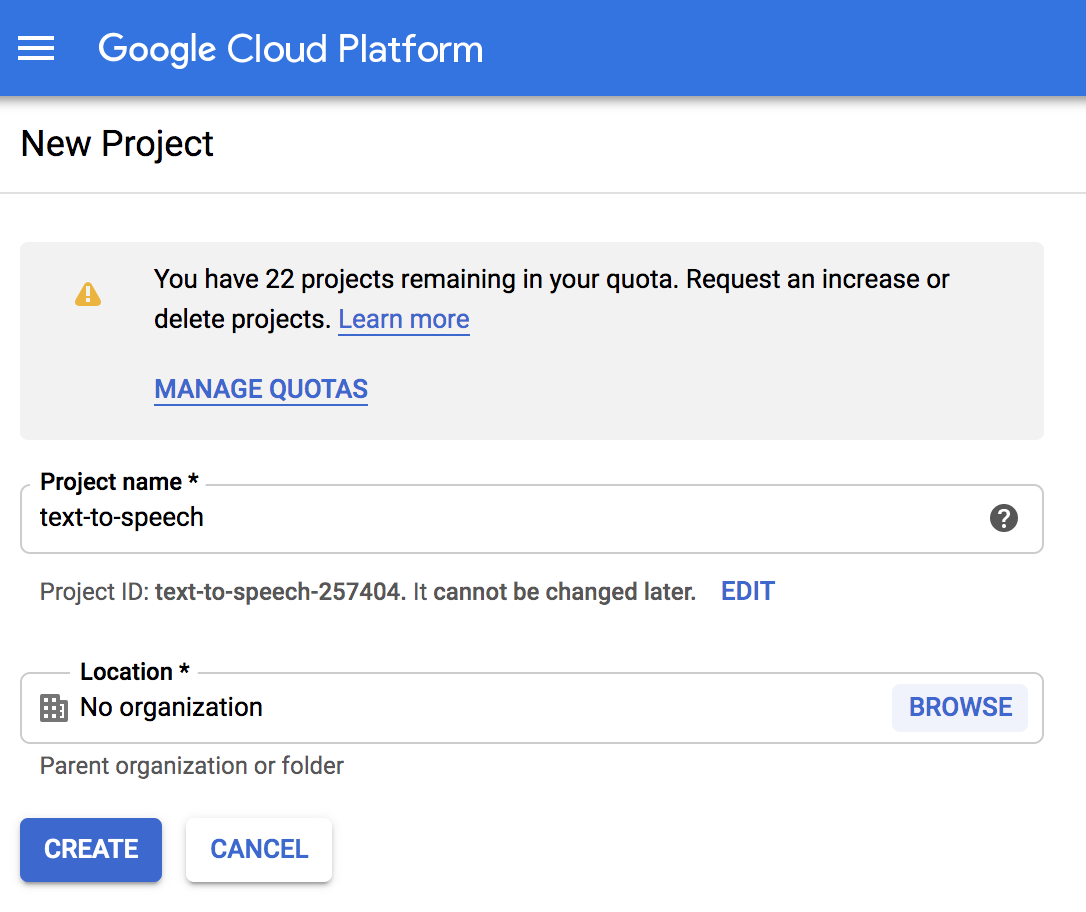
If you click that “Enable the API” button, you’ll be taken to the project creation page. This project basically functions as a label and administrative container for everything ranging from authentication (API keys) to billing (so you can see what you spend on each Google product you’re using). Give it a name (leave “organization” set to “no organization”).
This will trigger some background jobs where Google will provision the resources necessary to run your very own text-to-speech API. Finally, we’ll want to set up some authentication, so we can interact with this API. Create a service account for this project:
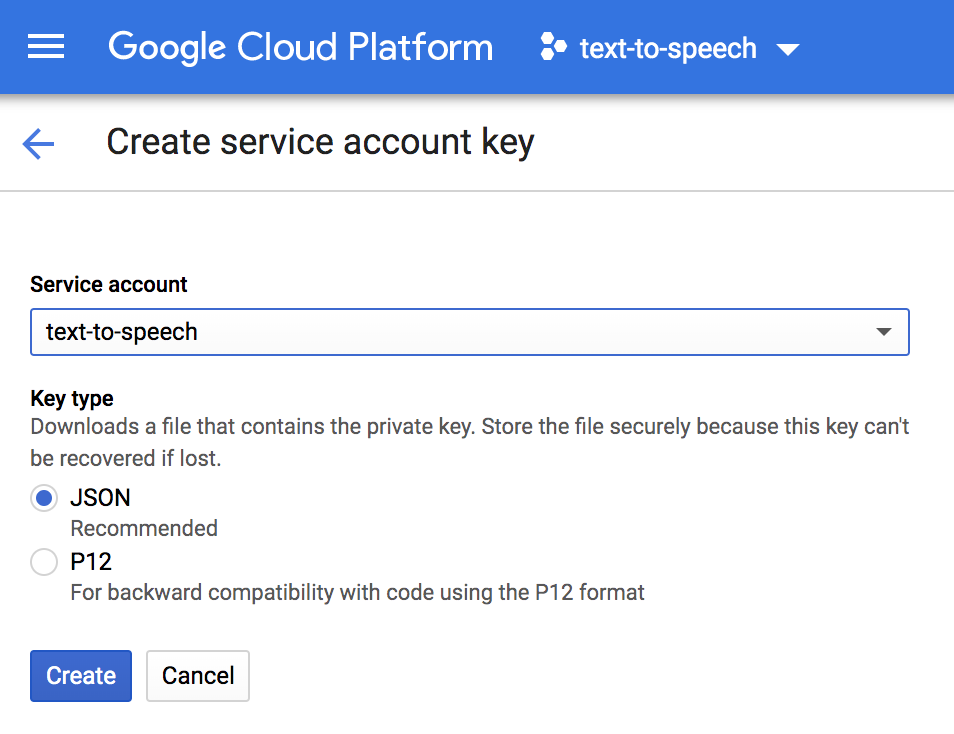
This will download a JSON file with API credentials to your computer. Do not throw away this file. You’ll want to set the environment variable GOOGLE_APPLICATION_CREDENTIALS to the file path of this JSON file. Keep in mind that this will set the variable for the duration of your terminal session, so you’ll have to set the variable again if you’re opening a new session.
# in this case, the file was downloaded to my Downloads folder; you may want to put it elsewhere
$ export GOOGLE_APPLICATION_CREDENTIALS=~/Downloads/text-to-speech-123456.json
With all that, we can get started on our script to process some Markdown!
Write a script to transform text to audio
I’m using Python for most of my scripting and hacking, so I’ve got virtualenv set up on my machine; this essentially installs a Python interpreter for every project, so I can keep dependencies separated. For this project we have the following requirements; install them with pip install -r requirements.txt, or individually (i.e. pip install Click==7.0 etc.):
beautifulsoup4==4.8.1
Click==7.0
pydub==0.23.1
Markdown==3.1.1
google-cloud-texttospeech==0.5.0
Click is a great library for building CLI’s in Python, and besides giving us some nice features, it will make it easy to convert this script to some executable later on.
We’ll be calling the script like this:
$ python text_to_speech.py path/to/markdown.md
The script will take the path to a Markdown file on disk, and do a couple of things to it:
- Read the file into memory
- Do some clean up, and convert it to plain text
- Send the text to our Google Cloud Text-to-Speech API, and write the audio from the response to disk
Read file from disk
# text_to_speech.py
import click
import logging
import os

logging.basicConfig(level=logging.INFO,
                    format='%(asctime)s %(levelname)s %(message)s')


@click.command()
@click.argument('filename', type=click.File('rb'))
def text_to_speech(filename):
    name = os.path.basename(filename.name).replace('.md', '')
    data = filename.read()

if __name__ == '__main__':
    text_to_speech()
This snippet defines a Click command, sets up logging, will try to open it’s argument as a file, stores the name of the file in a variable for later use, and reads and stores the contents of the file in a variable data. Step 1, check.
Convert to plain text
We need to send Google plain text as input for their model, so the next step is to add a function that will do some cleanup and extract the text from the Markdown-formatted file. In order to do that, we’ll apply some regular expressions and convert the Markdown to HTML first, and use BeautifulSoup to extract the text.
# text_to_speech.py
import click
import os

import re
from bs4 import BeautifulSoup
from markdown import markdown

def clean_text(text):
    # get rid of the Hugo preamble
    text = ''.join(text.decode('utf8').split('---')[2:]).strip()
    # get rid of superfluous newlines, as that counts towards our API limits
    text = re.sub('\n+', ' ', text)
    # we're hacking our way around the markdown by converting to html first,
    # just because BeautifulSoup makes life so easy
    html = markdown(text)

    html = re.sub(r'<pre>(.*?)</pre>', ' ', html)
    # this removes some artifacts from Hugo shortcodes
    html = re.sub(r'{{}}', '', html)
    html = re.sub(r'\[\^.*?\]', ' ', html)
    soup = BeautifulSoup(html, "html.parser")
    text = ''.join(soup.findAll(text=True))
    # get rid of superfluous whitespace
    return re.sub(r'\s+', ' ', text)


@click.command()
@click.argument('filename', type=click.File('rb'))
def text_to_speech(filename):
    name = os.path.basename(filename.name).replace('.md', '')
    data = filename.read()
    text = clean_text(data)
Now we extracted the plain text from our Markdown file, we can send it to Google:
from google.cloud import texttospeech

...

@click.command()
@click.argument('filename', type=click.File('rb'))
def text_to_speech(filename):
    name = os.path.basename(filename.name).replace('.md', '')
    data = filename.read()
    text = clean_text(data)

    text = clean_text(data)
    # initialize the API client
    client = texttospeech.TextToSpeechClient()
    # we can send up to 5000 characters per request, so split up the text
    step = 5000
    for j, i in enumerate(range(0, len(text), step)):
        synthesis_input = texttospeech.types.SynthesisInput(text=text[i:i+step])
        voice = texttospeech.types.VoiceSelectionParams(
            language_code='en-US',
            name='en-US-Wavenet-B'
        )
        audio_config = texttospeech.types.AudioConfig(
            audio_encoding=texttospeech.enums.AudioEncoding.MP3
        )
        logging.info(f'Synthesizing speech for {name}_{j}')
        response = client.synthesize_speech(synthesis_input, voice,
                                            audio_config)
        with open(f'{name}_{j}.mp3', 'wb') as out:
            # Write the response to the output file.
            out.write(response.audio_content)
            logging.info(f'Audio content written to file "{name}_{j}.mp3"')
Now, this is where we run into the first quirk of the API; it will only accept snippets of up to 5000 characters. My blog posts generally range between 12k to 15k characters, so I had to add some code that will chunk up the text into bits of 5000 characters each. Note that I don’t make any effort to detect word boundaries, so it can happen that a chunk will end with half a word; I’ll leave it up to the reader to improve upon my implementation7.
We provide some configuration (I like the voice of robot es-US-Wavenet-B, but there are loads of other voices and languages to choose from), specify we want to receive an MP3 back, and write out the response MP3 into separate chunks in the current working directory.
Next, we need to stitch the temporary MP3 chunks together (using the excellent pydub library), write the completed file to a sensible directory and clean up after ourselves.
import functools
from glob import glob
from pydub import AudioSegment

...

    mp3_segments = sorted(glob(f'{name}_*.mp3'))
    segments = [AudioSegment.from_mp3(f) for f in mp3_segments]

    logging.info(f'Stitching together {len(segments)} mp3 files for {name}')
    audio = functools.reduce(lambda a, b: a + b, segments)

    logging.info(f'Exporting {name}.mp3')
    audio.export(f'static/audio/{name}.mp3', format='mp3')
    logging.info(f'Exporting {name}.ogg')
    audio.export(f'static/audio/{name}.ogg', format='ogg')

    logging.info('Removing intermediate files')
    for f in mp3_segments:
        os.remove(f)
This will stitch the MP38 segments together (functools.reduce), write out an MP3 and an OGG file (with the same filename as the blog post Markdown file) to the static/audio directory I use (change to a destination folder of your liking if necessary), and deletes the intermediate files from the current directory.
You can find the complete script here.
Running the script for this article generates output that looks like this:
$ python scripts/text_to_speech.py content/post/2019-10-29-use-google-cloud-text-to-speech-to-create-an-audio-version-of-your-blog-posts.md
2019-10-29 23:19:59,995 INFO Synthesizing speech for 2019-10-29-use-google-cloud-text-to-speech-to-create-an-audio-version-of-your-blog-posts_0
2019-10-29 23:20:08,044 INFO Audio content written to file "2019-10-29-use-google-cloud-text-to-speech-to-create-an-audio-version-of-your-blog-posts_0.mp3"
2019-10-29 23:20:08,045 INFO Synthesizing speech for 2019-10-29-use-google-cloud-text-to-speech-to-create-an-audio-version-of-your-blog-posts_1
2019-10-29 23:20:13,709 INFO Audio content written to file "2019-10-29-use-google-cloud-text-to-speech-to-create-an-audio-version-of-your-blog-posts_1.mp3"
2019-10-29 23:20:13,709 INFO Synthesizing speech for 2019-10-29-use-google-cloud-text-to-speech-to-create-an-audio-version-of-your-blog-posts_2
2019-10-29 23:20:18,576 INFO Audio content written to file "2019-10-29-use-google-cloud-text-to-speech-to-create-an-audio-version-of-your-blog-posts_2.mp3"
2019-10-29 23:20:19,830 INFO Stitching together 3 mp3 files for 2019-10-29-use-google-cloud-text-to-speech-to-create-an-audio-version-of-your-blog-posts
2019-10-29 23:20:19,880 INFO Exporting 2019-10-29-use-google-cloud-text-to-speech-to-create-an-audio-version-of-your-blog-posts.mp3
2019-10-29 23:20:23,353 INFO Exporting 2019-10-29-use-google-cloud-text-to-speech-to-create-an-audio-version-of-your-blog-posts.ogg
2019-10-29 23:20:26,744 INFO Removing intermediate files
Include audio in the post
With this, we end up with a bunch of audio files a directory. In order to display them properly to our users so that they can actually consume the content, we have to do a little more work. Hugo provides shortcodes, which are effectively parameterized macro’s that expand into snippets of HTML that get embedded in your posts. There are many shortcodes included with standard Hugo (like figure, gist or tweet), but you can also create your own. We’ll leverage that to include some swanky HTML5 audio tags in our blog posts9.
<audio controls
    class="audio_controls {{ .Get "class" }}"
    {{ with .Get "id" }}id="{{ . }}"{{ end }}
    {{ with .Get "preload" }}preload="{{ . }}"{{ else }}preload="metadata"{{ end }}

    style="{{ with .Get "style" }}{{ . | safeCSS }}; {{ end }}"
    {{ with .Get "title" }}data-info-title="{{ . }}"{{ end }}
>
    {{ if .Get "src" }}
    <source {{ with .Get "src" }}src="{{ . }}"{{ end }}
        {{ with .Get "type" }}type="audio/{{ . }}"{{ end }}>
    {{ else if .Get "backup_src" }}
        <source src="{{ .Get "backup_src" }}"
            {{ with .Get "backup_type" }}type="audio/{{ . }}"{{ end }}
            {{ with .Get "backup_codec" }}codecs="{{ . }}"{{ end }}
        >
    {{ end }}
    Your browser does not support the audio element
</audio>
This snippet will give us access to a shortcode that injects some HTML into our post, and accepts a couple of parameters so we can include the appropriate audio file, the appropriate backup file, and override styling should we so choose. This file should be stored in layouts/shortcodes/audio.html, and can be included in your posts as follows:
Lorem ipsum dolor sit amet.

{{<audio src="/audio/name-of-your-audio-file.mp3" type="mp3" backup_src="/audio/name-of-your-audio-file.ogg" backup_type="ogg">}}

Some more words, this time not in Latin.
This will include an audio player looking like this in your blog post. I’ve added some bells and whistles to mine, with some additional styling for all the UX points.

Not to mention that audio content is more easily accessible for people that suffer from dyslexia or poor sight, or seems to be a lot better for user engagement. ↩︎
It has all kinds of funky stuff, like multiple languages, API clients in your favorite programming language, pitch, speaking rates and volume controls, and even optimizations around where your audio is going to play, such as headphones or phone lines. ↩︎
Free is my favorite price. ↩︎
My website is a static website generated from Markdown files with Hugo, hosted on GitHub Pages, so you may need to make some small changes to make it work with Jekyll, Next.js or whichever other static site generator you’re using. ↩︎
Don’t worry, the API is free for the first 4 million characters per month for standard voices, or 1 million characters for fancy WaveNet voices. ↩︎
Pull requests are always welcome! 😄 ↩︎
pydubrequiresffmpegorlibavto be installed to open, convert and save non-WAV files (such as MP3 or OGG) ↩︎Not all browsers support all file types and audio codecs, which is why we’ve generated the OGG files as backup. ↩︎